一、基本概念
OkHttp3 有两种运行方式:
1.同步
2.异步
在了解OkHttp的任务队列原理之前,先了解一下线程、多线程、线程池的基本概念。
线程:进程中负责程序执行的最小单元。每个正在系统上运行的程序都是一个进程。每个进程包含一到多个线程。进程也可能是整个程序或者是部分程序的动态执行。线程是一组指令的集合,或者是程序的特殊段,它可以在程序里独立执行。也可以把它理解为代码运行的上下文。所以线程基本上是轻量级的进程,它负责在单个程序里执行多任务。通常由操作系统负责多个线程的调度和执行。
线程是程序中一个单一的顺序控制流程.在单个程序中同时运行多个线程完成不同的工作,称为多线程.
线程和进程的区别在于,子进程和父进程有不同的代码和数据空间,而多个线程则共享数据空间,每个线程有自己的执行堆栈和程序计数器为其执行上下文.多线程主要是为了节约CPU时间,发挥利用,根据具体情况而定. 线程的运行中需要使用计算机的内存资源和CPU。多线程:那么了解了线程,对多线程就很好理解了。指的是这个程序(一个进程)运行时产生了不止一个线程
线程池:线程池是一种多线程处理形式,处理过程中将任务添加到队列,然后在创建线程后自动启动这些任务。线程池线程都是后台线程。每个线程都使用默认的堆栈大小,以默认的优先级运行,并处于多线程单元中。如果某个线程在托管代码中空闲(如正在等待某个事件),则线程池将插入另一个辅助线程来使所有处理器保持繁忙。如果所有线程池线程都始终保持繁忙,但队列中包含挂起的工作,则线程池将在一段时间后创建另一个辅助线程但线程的数目永远不会超过最大值。超过最大值的线程可以排队,但他们要等到其他线程完成后才启动。
了解了基本概念,就来看一下OkHttp的任务队列。
从上面的基本概念就可以知道,线程池的关键在于线程复用来减少非核心任务的损耗。减少创建和销毁的事件,提高效率。即:
1.通过对线程进行缓存,减少了创建销毁的时间损失;
2.通过控制线程数量阀值,减少了当线程过少时带来的CPU闲置(比如说长时间卡在I/O上了)与线程过多时对JVM的内存与线程切换时系统调用的压力.
二、OkHttp请求方式
1.同步
OkHttpClient client = new OkHttpClient();

String run(String url) throws IOException {
  Request request = new Request.Builder()
      .url(url)
      .build();

  Response response = client.newCall(request).execute();
  return response.body().string();
}
2.异步
OkHttpClient client = new OkHttpClient();
    Request request = new Request.Builder()
            .url("")
            .build();
    Call call = client.newCall(request);
    try {
        call.enqueue(new okhttp3.Callback() {
            @Override
            public void onFailure(Call call, IOException e) {
                Log.d("OkHttp", "Call Failed:" + e.getMessage());
            }

            @Override
            public void onResponse(Call call, Response response) throws IOException {
                Log.d("OkHttp", "Call succeeded:" + response.message());
            }
        });
    } catch (Exception e) {
        Log.e("OkHttp",e.getMessage());
    }
先看同步是如何实现的。看源码
RealCall.java
@Override public Response execute() throws IOException {
synchronized (this) {
  if (executed) throw new IllegalStateException("Already Executed");
  executed = true;
}
captureCallStackTrace();
try {
//执行同步请求
  client.dispatcher().executed(this);
  Response result = getResponseWithInterceptorChain();
  if (result == null) throw new IOException("Canceled");
  return result;
} finally {
  client.dispatcher().finished(this);
}
  }
Dispatcher.java
   /** Used by {@code Call#execute} to signal it is in-flight. */
synchronized void executed(RealCall call) {
  runningSyncCalls.add(call);
}
直接加入到运行中同步任务队列runningSyncCalls中执行即完成。
异步请求
RealCall.java
@Override public void enqueue(Callback responseCallback) {
synchronized (this) {
  if (executed) throw new IllegalStateException("Already Executed");
  executed = true;
}
captureCallStackTrace();
client.dispatcher().enqueue(new AsyncCall(responseCallback));
  }
也是通过Dispatcher入队。
Dispatcher.java
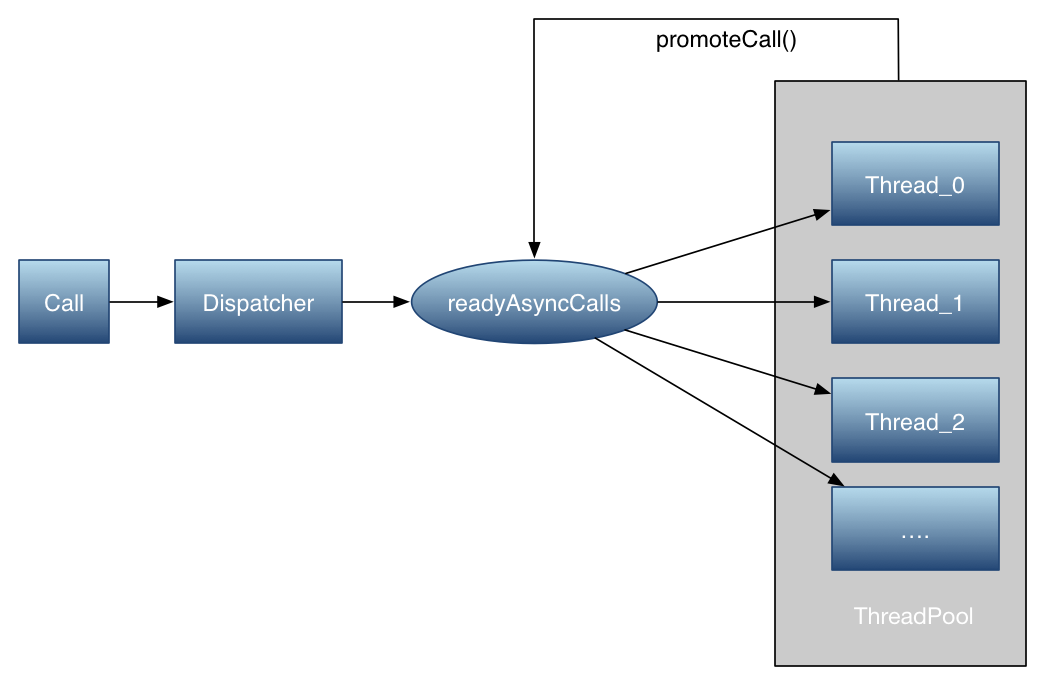
 synchronized void enqueue(AsyncCall call) {
  if (runningAsyncCalls.size() < maxRequests && runningCallsForHost(call) < maxRequestsPerHost) {
    runningAsyncCalls.add(call);
    executorService().execute(call);
  } else {
    readyAsyncCalls.add(call);
  }
}
根据判断条件,加到对应的队列中。(runningRequests<64 && runningRequestsPerHost<5)如果满足条件,那么就直接把AsyncCall直接加到runningCalls的队列中,并在线程池中执行(线程池会根据当前负载自动创建,销毁,缓存相应的线程)。反之就放入readyAsyncCalls进行缓存等待。

AsyncCall

    @Override protected void execute() {
      boolean signalledCallback = false;
      try {
        Response response = getResponseWithInterceptorChain();
        if (retryAndFollowUpInterceptor.isCanceled()) {
          signalledCallback = true;
          responseCallback.onFailure(RealCall.this, new IOException("Canceled"));
        } else {
          signalledCallback = true;
          responseCallback.onResponse(RealCall.this, response);
        }
      } catch (IOException e) {
        if (signalledCallback) {
          // Do not signal the callback twice!
          Platform.get().log(INFO, "Callback failure for " + toLoggableString(), e);
        } else {
          responseCallback.onFailure(RealCall.this, e);
        }
      } finally {
        client.dispatcher().finished(this);
      }
    }


当任务执行完成后,无论是否有异常,finally代码段总会被执行,也就是会调用Dispatcher的finished函数,打开源码,发现它将正在运行的任务Call从队列runningAsyncCalls中移除后,接着执行promoteCalls()函数

再看promoteCalls方法

    private void promoteCalls() {
    if (runningAsyncCalls.size() >= maxRequests) return; // Already running max capacity.
    if (readyAsyncCalls.isEmpty()) return; // No ready calls to promote.

    for (Iterator<AsyncCall> i = readyAsyncCalls.iterator(); i.hasNext(); ) {
      AsyncCall call = i.next();

      if (runningCallsForHost(call) < maxRequestsPerHost) {
      //当运行中的队列可以继续加入任务时,将缓存等待队列中的移到运行队列在合适的时机执行
        i.remove();
        runningAsyncCalls.add(call);
        executorService().execute(call);
      }

      if (runningAsyncCalls.size() >= maxRequests) return; // Reached max capacity.
    }
      }

 扫描待执行任务队列,将任务放入正在执行任务队列,并执行该任务。就这样把缓存队列中的任务加入到运行中的队列中执行。
三、OkHttp任务队列
看一下Dispacher源码
public final class Dispatcher {
private int maxRequests = 64;
private int maxRequestsPerHost = 5;
private @Nullable Runnable idleCallback;

/** Executes calls. Created lazily. */
private @Nullable ExecutorService executorService;

/** Ready async calls in the order they'll be run. */
private final Deque<AsyncCall> readyAsyncCalls = new ArrayDeque<>();

/** Running asynchronous calls. Includes canceled calls that haven't finished yet. */
private final Deque<AsyncCall> runningAsyncCalls = new ArrayDeque<>();

/** Running synchronous calls. Includes canceled calls that haven't finished yet. */
private final Deque<RealCall> runningSyncCalls = new ArrayDeque<>();

public Dispatcher(ExecutorService executorService) {
  this.executorService = executorService;
}

public Dispatcher() {
}

public synchronized ExecutorService executorService() {
  if (executorService == null) {
    executorService = new ThreadPoolExecutor(0, Integer.MAX_VALUE, 60, TimeUnit.SECONDS,
        new SynchronousQueue<Runnable>(), Util.threadFactory("OkHttp Dispatcher", false));
  }
  return executorService;
}
几个重要的知识点:
readyAsyncCalls :待执行异步任务队列
runningAsyncCalls:运行中异步任务队列
runningSyncCalls:运行中同步任务队列
executorService:任务队列线程池
几种队列很好理解,再解释一下OkHttp中的队列线程池
看一下ThreadPoolExecutor.java
public ThreadPoolExecutor(int corePoolSize,
                            int maximumPoolSize,
                            long keepAliveTime,
                            TimeUnit unit,
                            BlockingQueue<Runnable> workQueue,
                            ThreadFactory threadFactory) {
      this(corePoolSize, maximumPoolSize, keepAliveTime, unit, workQueue,
           threadFactory, defaultHandler);
  }
解释一下这些参数的具体含义:
- int corePoolSize: 最小并发线程数,这里并发同时包括空闲与活动的线程,如果是0的话,空闲一段时间后所有线程将全部被销毁
- int maximumPoolSize: 最大线程数,当任务进来时可以扩充的线程最大值,当大于了这个值就会根据丢弃处理机制来处理
- long keepAliveTime: 当线程数大于corePoolSize时,多余的空闲线程的最大存活时间,类似于HTTP中的Keep-alive
- TimeUnit unit: 时间单位,一般用秒
- BlockingQueue workQueue: 工作队列,先进先出,可以看出并不像Picasso那样设置优先队列
- ThreadFactory threadFactory: 单个线程的工厂,可以打Log,设置Daemon(即当JVM退出时,线程自动结束)等
也就是说在Okhttp中,构建了一个阀值为[0, Integer.MAX_VALUE]的线程池,它不保留任何最小线程数,随时创建更多的线程数,当线程空闲时只能活60秒,它使用了一个不存储元素的阻塞工作队列,一个叫做”OkHttp Dispatcher”的线程工厂。
也就是说,在实际运行中,当收到10个并发请求时,线程池会创建十个线程,当工作完成后,线程池会在60s后相继关闭所有线程。
四、Dispatcher
dispatcher分发器类似于Ngnix中的反向代理,通过Dispatcher将任务分发到合适的空闲线程,实现非阻塞,高可用,高并发连接
五、总结
- OkHttp采用Dispatcher技术,类似于Nginx,与线程池配合实现了高并发,低阻塞的运行
- Okhttp采用Deque作为缓存,按照入队的顺序先进先出
- OkHttp最出彩的地方就是在try/finally中调用了finished函数,可以主动控制等待队列的移动,而不是采用锁或者wait/notify,极大减少了编码复杂性


